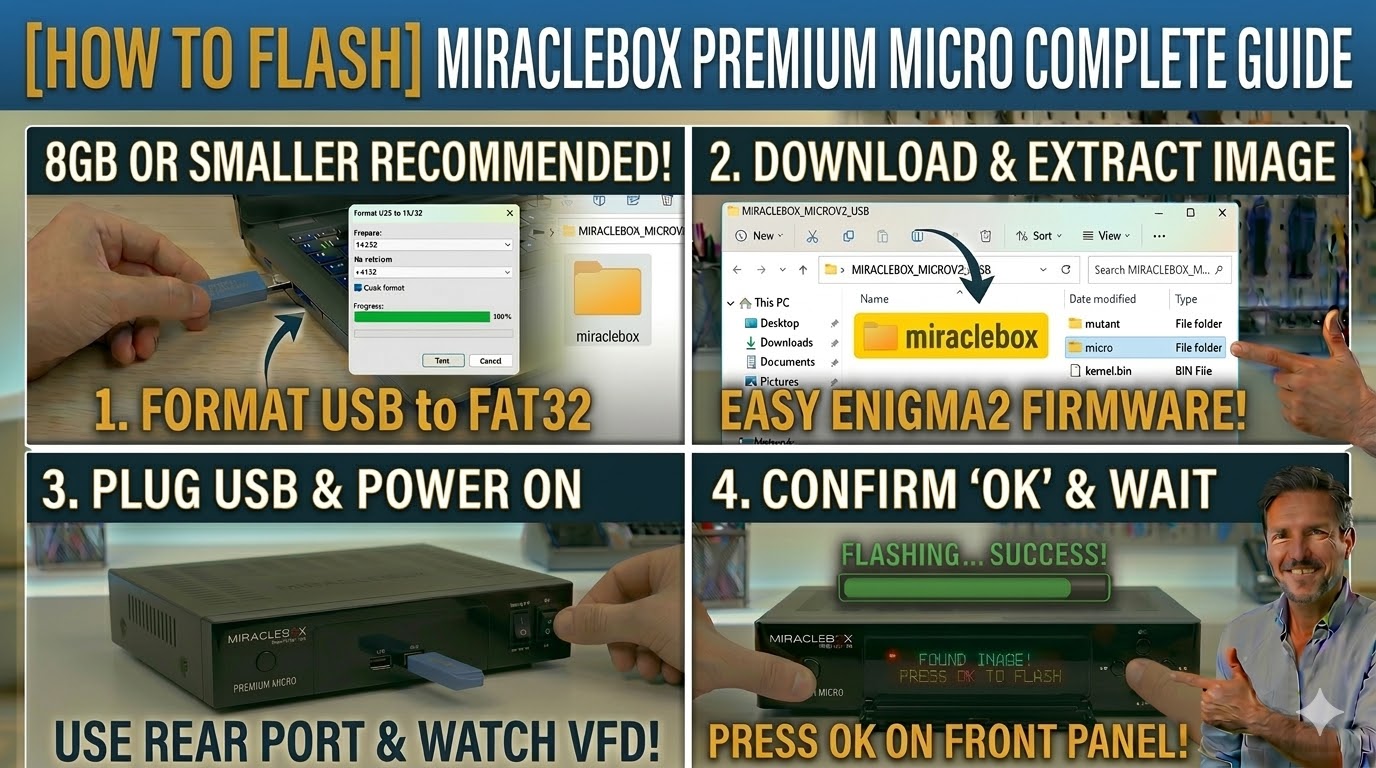
[HOW TO FLASH] how to flash Miraclebox Premium Micro

To flash the original Miraclebox Premium Micro (the V1 version), you will follow the standard procedure for the Premium line, but with a specific subfolder name that distinguishes it from the V2 or the Mini models.
1. Preparation
-
USB Stick: A high-quality USB stick (8GB or smaller is highly recommended for original Micro bootloaders).
-
Format: The stick must be formatted to FAT32.
-
Firmware: Download the image specifically for the Premium Micro (e.g., OpenATV, OpenPLi).
2. Folder Structure
The bootloader identifies the image via the miraclebox directory and the micro subfolder.
-
Extract the firmware
.zipfile on your computer. -
You will see a folder named
miraclebox. -
Copy the entire
miracleboxfolder to the root of your USB stick.-
Path:
USB:\miraclebox\micro\ -
Contents: Inside the
microsubfolder, you should see files likekernel.bin,rootfs.bin, andimageversion.
-
3. The Flashing Process
-
Power Off: Unplug the power lead from the back of the receiver.
-
Insert USB: Plug the USB stick into the rear USB port.
-
Power On: Plug the power lead back in.
-
Initiate Flash:
-
Watch the front panel LED.
-
When the receiver detects the USB (the LED may change color or a message like “Found Image! Press OK to flash” will appear if you have a display), quickly press the Power/OK button on the front panel to confirm.
-
-
Wait: The flashing process will start. Do not interrupt the power.
-
Completion: The receiver will reboot automatically once finished.
Pro-Tip for enigma2.net
The main distinction for your readers is the folder name. While the V2 uses microv2, the original version must use micro. If a user tries to flash a V1 box with the V2 folder (or vice versa), the box will simply ignore the USB. Always advise them to check the label on the underside or the front panel of the box to confirm which version they own.