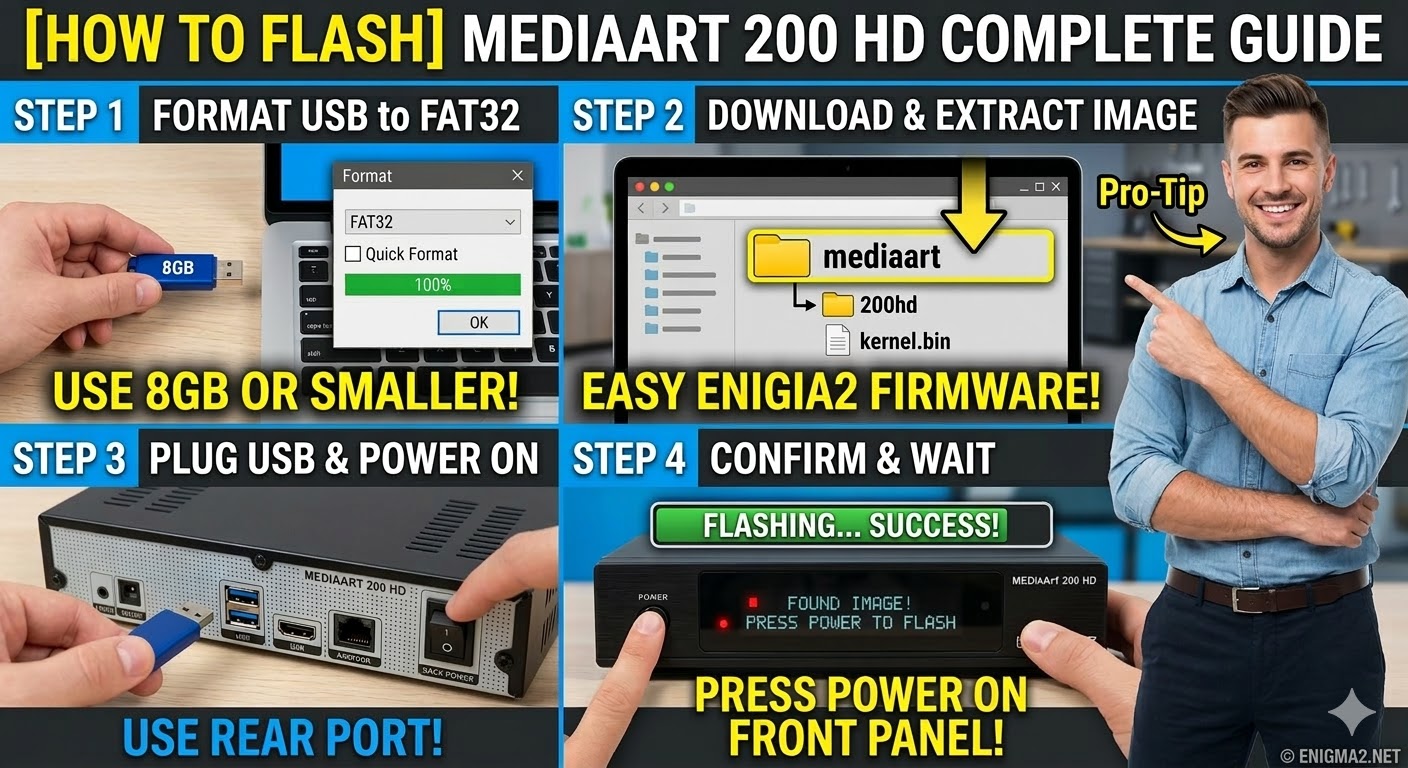
[HOW TO FLASH] how to flash MediaArt 200 HD

To flash the MediaArt 200 HD, you will follow a procedure very similar to other Broadcom-based receivers like the Miraclebox or Octagon models. This receiver is a compact Full HD box that relies on a specific folder name to trigger the update from the USB port.
1. Preparation
-
USB Stick: A high-quality USB 2.0 or 3.0 stick. Use 8GB or smaller for the best chance of the bootloader recognizing it.
-
Format: The stick must be formatted to FAT32.
-
Firmware: Download the image specifically for the MediaArt 200 HD (OpenATV is the most common support for this model).
2. Folder Structure
The receiver looks for a manufacturer-specific directory on the USB root.
-
Extract the downloaded firmware zip file.
-
You will see a folder named
mediaart. -
Copy the entire
mediaartfolder to the root of your USB stick.-
Path:
USB:\mediaart\200hd\ -
Contents: Inside the
200hdfolder, you should see files likekernel.bin,rootfs.bin, andimageversion.
-
3. The Flashing Process
-
Power Off: Turn off the receiver using the power switch at the back (or unplug the power lead).
-
Insert USB: Plug the USB stick into the rear USB port.
-
Power On: Turn the power back ON.
-
Initiate Flash:
-
Watch the front panel LED or the TV screen.
-
When the receiver detects the USB, the front LED will usually change color or start flashing.
-
Quickly press the Power button (or sometimes the CH+ button) on the front panel to confirm the flash.
-
-
Wait: The LED will flash during the process. Do not interrupt the power.
-
Completion: The receiver will reboot automatically once the flash is done. You can then remove the USB stick.

The flashing process should take approximately two to four minutes to complete, while the receiver
is being flashed it is vitally important that you DO NOT power the receiver down for any reason as
this can cause serious and or permanent damage.