[HOW TO FLASH] how to flash VisionNet Marvel1

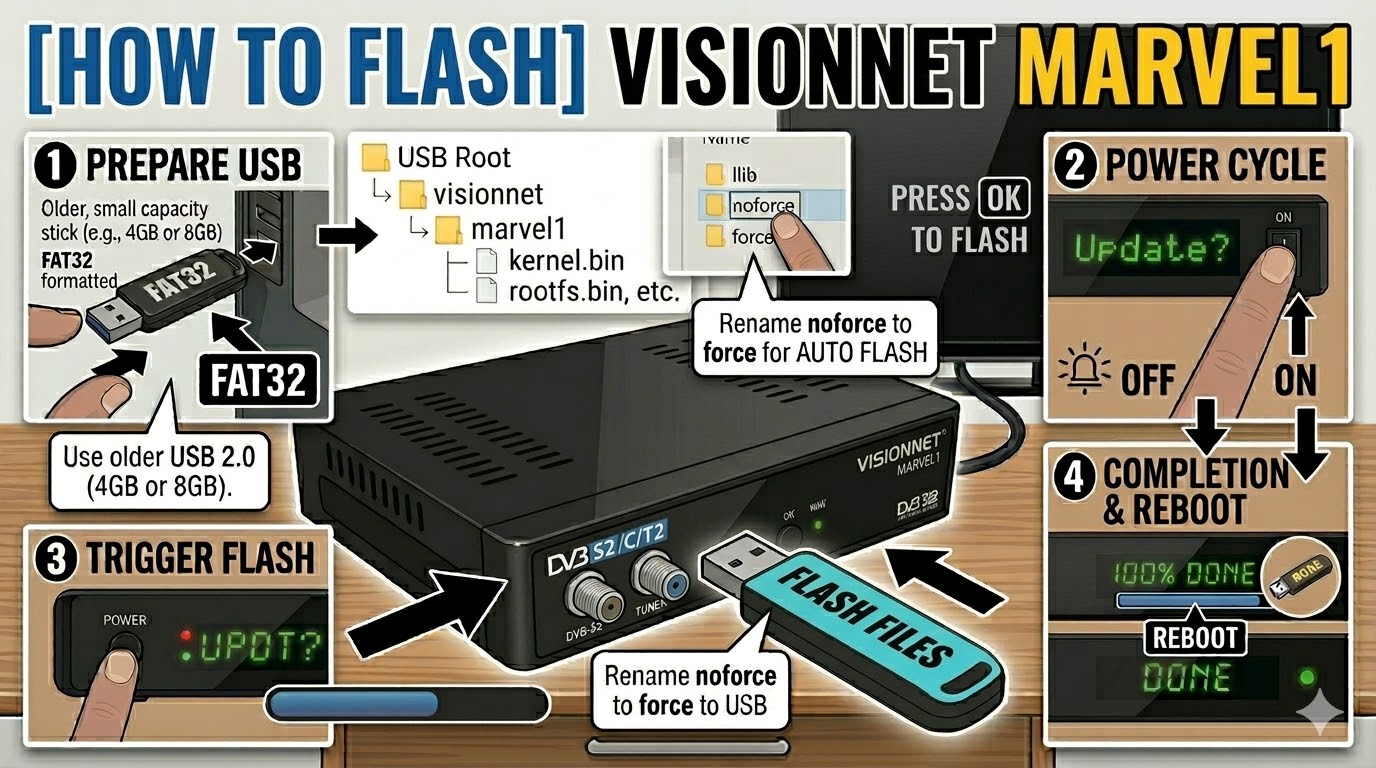
The VisionNet Marvel1 is a specialized Enigma2 receiver that relies on a specific folder structure to trigger its update mode. It’s known for being a bit sensitive to USB types, so following the preparation steps closely is key.
Preparation
-
USB Drive: Use a FAT32 formatted USB stick. It is strongly recommended to use a USB 2.0 drive with a capacity of 8GB or less. High-speed USB 3.0 drives often fail to be recognized by the Marvel1 bootloader.
-
The Files: Extract your image zip file. You are looking for a folder named
visionnetand a subfolder inside it namedmarvel1. -
Path: Copy the
visionnetfolder to the root of your USB drive.-
Structure:
USB Stick -> visionnet -> marvel1 -> (image files: kernel.bin, rootfs.bin, etc.)
-
Flashing Steps
-
Power Down: Turn off the receiver using the physical rocker switch at the back.
-
Insert USB: Plug the USB stick into the rear USB port for the most stable connection.
-
Power On: Flip the rear switch to ON.
-
The Trigger: * Watch the front panel LED or the TV screen.
-
When the front panel display shows “UPDT” or a prompt appears, immediately press the Power Button on the front of the receiver.
-
-
Flashing Process: The display will show “prog” or a progress indicator. This usually takes 3 to 5 minutes. Do not cut the power during this phase.
-
Completion: The receiver will show “DONE” or “SUCCESS” and reboot automatically.
-
Finalize: Remove the USB stick as soon as the box starts to reboot to prevent it from detecting the flash files again.
Quick Troubleshooting
-
Not Starting: If the box boots to your old image, ensure the folder name is exactly
marvel1. If it still fails, try a different brand of USB stick; older “no-name” sticks often work best for flashing. -
Automatic Flash: If you have trouble with the front button, find the
noforcefile inside themarvel1folder on your USB and rename it toforce. The receiver will then flash automatically upon power-up.