[HOW TO FLASH] how to flash Mutant HD60

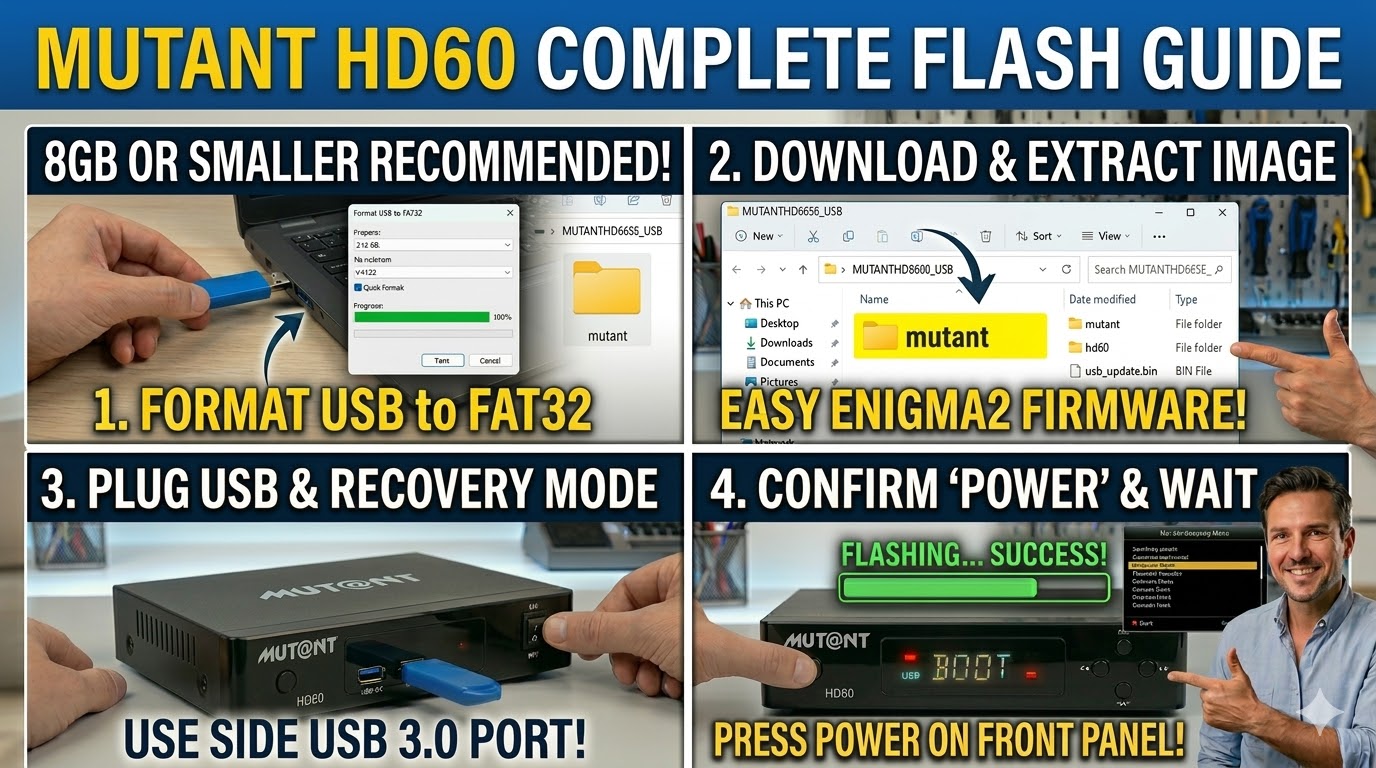
To flash the Mut@nt HD60, you will use the USB recovery method. This model is based on the HiSilicon Hi3798MV200 chipset, which utilizes a recovery menu for flashing, similar to the HD66 SE.
1. Preparation
-
USB Stick: A high-quality USB 2.0 or 3.0 stick (8GB or smaller is best).
-
Format: Format the stick to FAT32.
-
Firmware: Download the image specifically for the HD60.
-
Recovery: Look for
_recovery.emmc.zip(standard for a fresh install). -
Multiboot: Look for
_mmc.zip(for adding to a specific slot).
-
2. Folder Structure
The Mut@nt HD60 bootloader specifically searches for the mutant directory.
-
Extract the firmware
.zipfile. -
Copy the entire
mutantfolder to the root of your USB stick.-
Path:
USB:\mutant\hd60\ -
Contents: Inside, you should see files like
usb_update.bin,boot.img, androotfs.tar.bz2.
-
3. The Flashing Process (Recovery Menu)
-
Power Off: Turn off the receiver using the power switch at the back.
-
Insert USB: Plug the stick into the side USB 3.0 port.
-
Enter Recovery:
-
Press and hold the Power button on the front panel.
-
While holding it, turn the back power switch to ON.
-
Continue holding until the Recovery Menu appears on your TV screen.
-
-
Select Flash: Use the remote to navigate to “Flash Recovery Image” (for emmc) or “USB Multiboot Image Upgrade” (for mmc slot updates).
-
Confirm: Select the file and press OK. The display will show “UPDT”, and the box will reboot automatically when finished.
Pro-Tip for enigma2.net
The HD60 was one of the first popular 4K boxes to introduce this specific HiSilicon recovery menu. When creating your guide, emphasize that the folder name must be exactly hd60 inside the mutant directory. If the folder is named hd66se or just mutant, the flash will not trigger.
Would you like me to generate a multi-step thumbnail for the Mut@nt HD60?
To flash the Mut@nt HD60, you will use the USB recovery method. This model is based on the HiSilicon Hi3798MV200 chipset, which utilizes a recovery menu for flashing, similar to the HD66 SE.
1. Preparation
-
USB Stick: A high-quality USB 2.0 or 3.0 stick (8GB or smaller is best).
-
Format: Format the stick to FAT32.
-
Firmware: Download the image specifically for the HD60.
-
Recovery: Look for
_recovery.emmc.zip(standard for a fresh install). -
Multiboot: Look for
_mmc.zip(for adding to a specific slot).
-
2. Folder Structure
The Mut@nt HD60 bootloader specifically searches for the mutant directory.
-
Extract the firmware
.zipfile. -
Copy the entire
mutantfolder to the root of your USB stick.-
Path:
USB:\mutant\hd60\ -
Contents: Inside, you should see files like
usb_update.bin,boot.img, androotfs.tar.bz2.
-
3. The Flashing Process (Recovery Menu)
-
Power Off: Turn off the receiver using the power switch at the back.
-
Insert USB: Plug the stick into the side USB 3.0 port.
-
Enter Recovery:
-
Press and hold the Power button on the front panel.
-
While holding it, turn the back power switch to ON.
-
Continue holding until the Recovery Menu appears on your TV screen.
-
-
Select Flash: Use the remote to navigate to “Flash Recovery Image” (for emmc) or “USB Multiboot Image Upgrade” (for mmc slot updates).
-
Confirm: Select the file and press OK. The display will show “UPDT”, and the box will reboot automatically when finished.
Pro-Tip for enigma2.net
The HD60 was one of the first popular 4K boxes to introduce this specific HiSilicon recovery menu. When creating your guide, emphasize that the folder name must be exactly hd60 inside the mutant directory. If the folder is named hd66se or just mutant, the flash will not trigger.