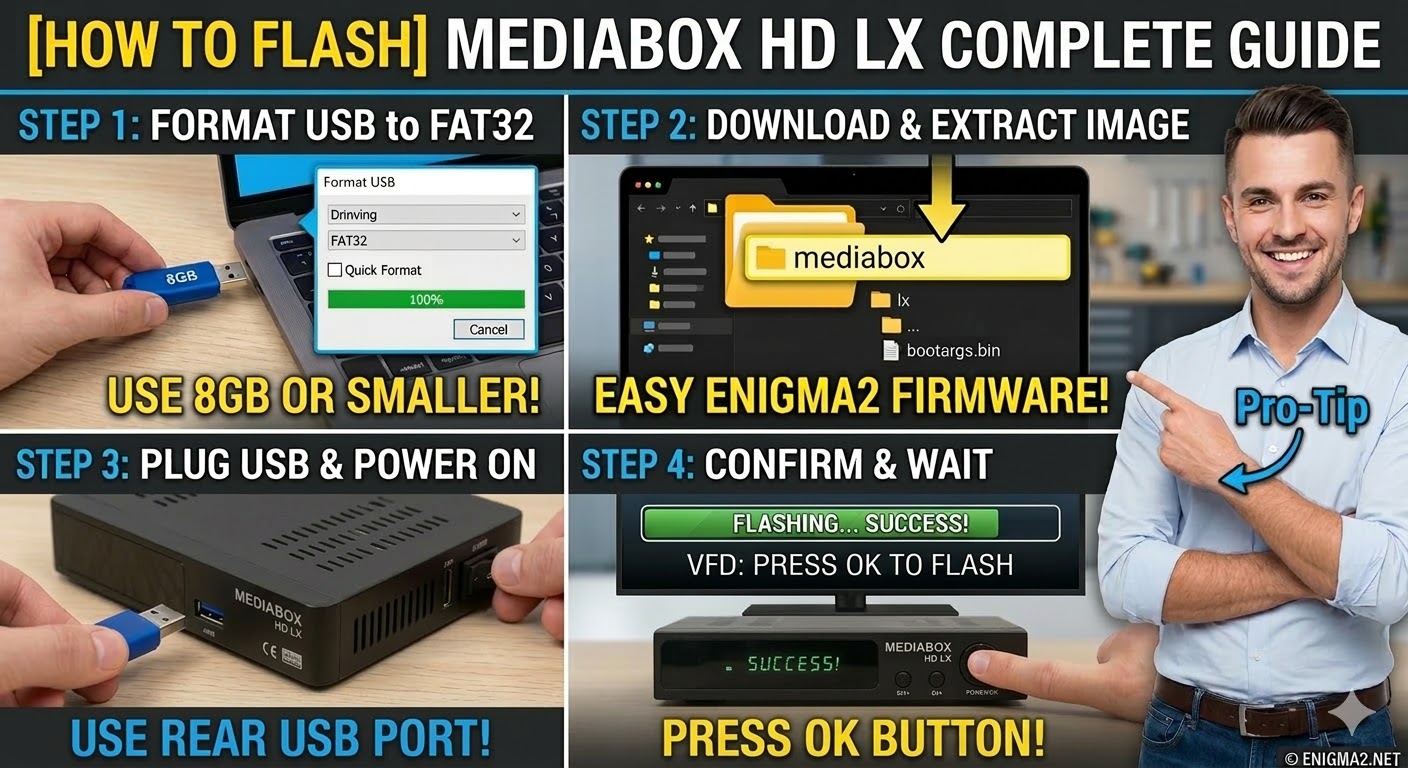
[HOW TO FLASH] how to flash Mediabox HD LX

To flash the Mediabox HD LX (often referred to as the LX-1 or LX-2), you’ll follow a method very similar to other Xpeed or Mediabox Broadcom receivers. This box is known for being a reliable Enigma2 workhorse, but it is quite picky about the USB stick and folder structure.
1. Preparation
-
USB Stick: Use a high-quality USB 2.0 stick. For this specific model, 4GB or 8GB sticks formatted to FAT32 have the highest success rate.
-
Firmware: Download the image specifically for the Mediabox HD LX (OpenATV or OpenHDF are popular for this hardware).
2. Folder Structure
The bootloader looks for a manufacturer-specific directory.
-
Extract the downloaded firmware
.zipfile. -
You should see a folder named
mediabox. -
Copy the entire
mediaboxfolder to the root of your USB stick.-
Path:
USB:\mediabox\lx\ -
Contents: Inside the
lxfolder, you should see files likekernel.bin,rootfs.bin, andimageversion.
-
3. The Flashing Process
-
Power Off: Turn off the receiver using the power switch at the back.
-
Insert USB: Plug the USB stick into the rear USB port.
-
Power On: Turn the back power switch to ON.
-
Initiate Flash:
-
Watch the front panel display.
-
When the receiver detects the USB, it will display a message like “USB” or “Found Image”.
-
Quickly press the Power/OK button on the front panel to confirm the flash.
-
-
Wait: The display will show the progress (e.g., “FLSH”). Do not turn off the power.
-
Completion: The receiver will reboot automatically once the process is 100% complete.
Pro-Tip for enigma2.net
The Mediabox HD LX series often has a very short “timeout” for the confirmation button. Remind your users to be ready to press the front panel button as soon as they flip the power switch. If the box boots normally into the old software, the most common causes are a folder named incorrectly (it must be mediabox\lx) or a USB stick that is too large/fast for the old bootloader to read.