[HOW TO FLASH] how to flash Medialink ixuss zero
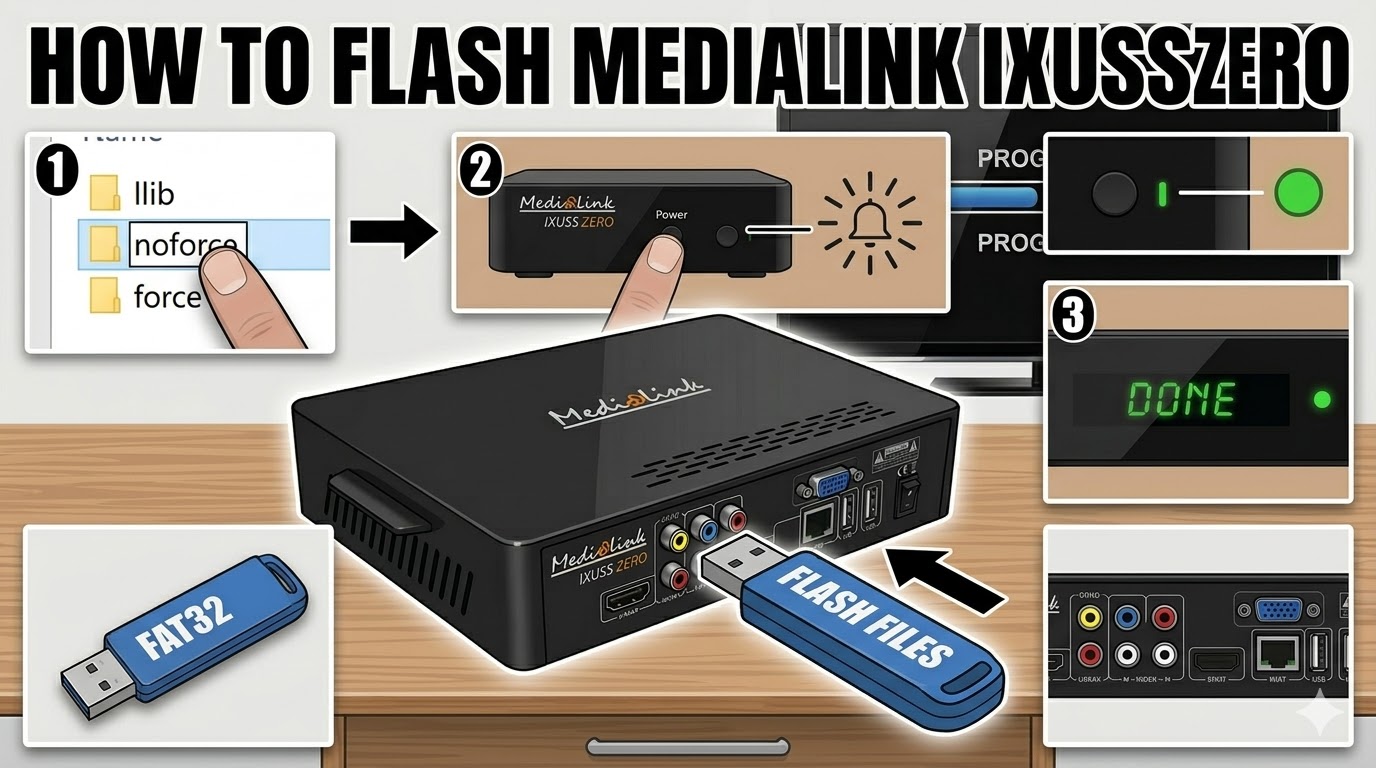
The Medialink Ixuss Zero is a compact Enigma2 receiver, and the flashing process is very similar to its bigger brother, the Ixuss One, with a few specific timing cues you need to watch for.
Preparation
-
USB Stick: Use a FAT32 formatted USB drive (ideally 2GB or 4GB for maximum compatibility).
-
The Files: Extract your chosen image (OpenATV, etc.). You should see a folder named
ixusszero. -
Root Directory: Copy the entire
ixusszerofolder to the root of your USB stick.
Flashing Steps
-
Power Off: Turn off the Ixuss Zero using the power switch at the back (or unplug the power cable).
-
Insert USB: Plug the USB stick into the rear USB port.
-
Power On: Turn the receiver back on.
-
The Trigger: Watch the front panel LED or the TV screen:
-
As soon as the receiver powers up and detects the USB, the front LED will likely blink or change color (often flashing between red/green or blue).
-
Press the Power Button on the front panel (or sometimes the CH+ button) to confirm you want to flash.
-
-
Flashing Process: The LED will begin to blink rapidly, indicating the update is in progress.
-
Note: Unlike the Ixuss One, the Zero lacks a detailed VFD display, so the LED color/pattern is your only indicator.
-
-
Completion: Once the LED stops blinking or turns a solid color (usually green), the process is finished.
-
Reboot: Remove the USB stick and power-cycle the box.
Quick Tips for Success
-
The “No-Prompt” Method: If the box won’t trigger the flash, rename the file
noforcetoforceinside theixusszerofolder. This will make the box flash automatically upon boot without needing a button press. -
Rear Port Only: Always use the rear USB port for flashing; the internal bus often prioritizes it during the bootloader phase.
Would you like me to generate a thumbnail image for this “How to Flash” guide for the Ixuss Zero?