[HOW TO FLASH] how to flash Xsarius galaxy 4k
The Xsarius Galaxy 4K is a high-end Enigma2 receiver with a built-in display. The flashing process is very similar to the Revo 4K but relies on the front panel’s VFD to confirm the update.
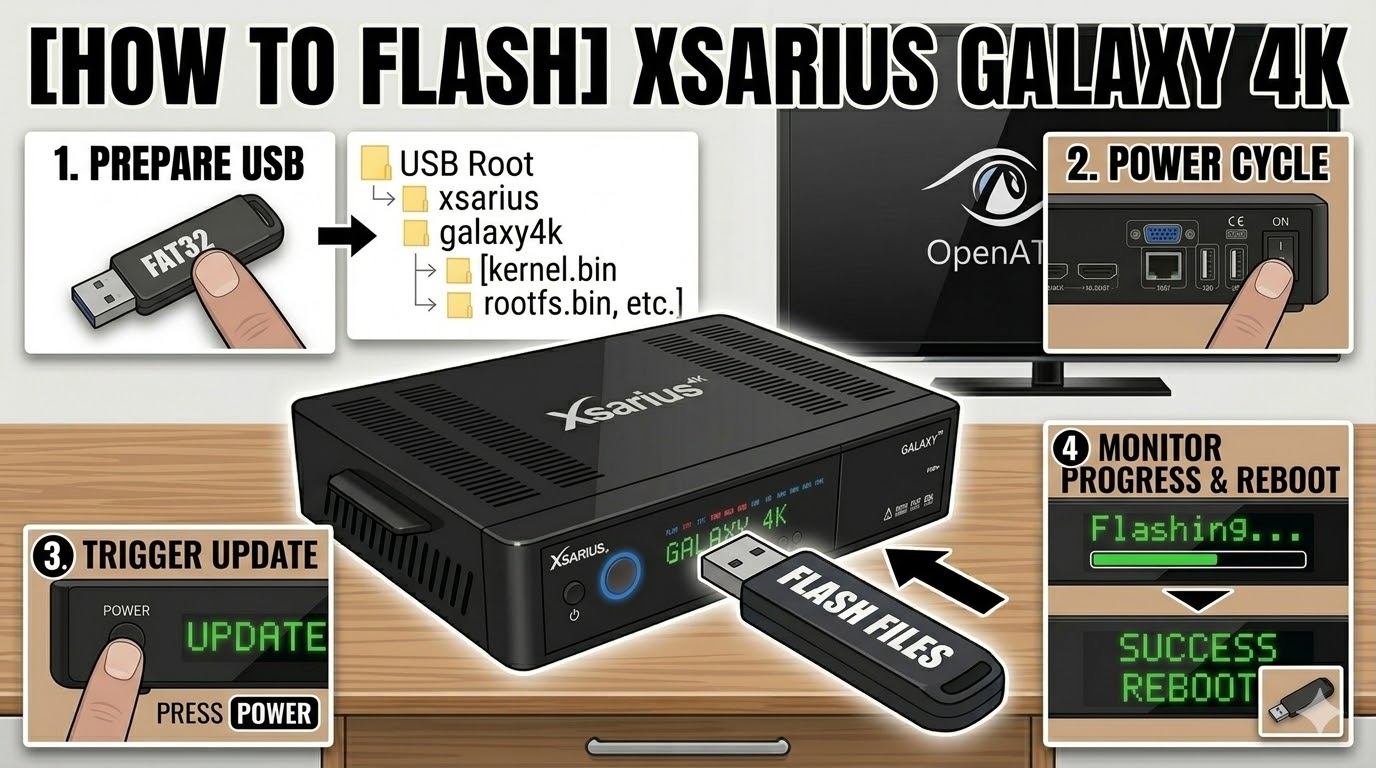
Preparation
-
USB Drive: Use a FAT32 formatted USB stick. For 4K models, a 4GB or 8GB USB 2.0 stick is the “gold standard” for reliability.
-
The Files: Extract your image (OpenATV, Egami, etc.). You must see a folder named
xsariuscontaining a subfolder namedgalaxy4k. -
Correct Path: Copy the
xsariusfolder to the root of the USB.-
Path:
USB -> xsarius -> galaxy4k -> (image files)
-
Flashing Steps
-
Power Down: Turn off the receiver using the physical power switch at the back.
-
Insert USB: Plug the USB drive into the rear USB port.
-
Power On: Flip the rear switch to ON.
-
The Trigger: * Watch the front panel display (VFD).
-
When it shows “UPDATE” or “Press OK”, immediately press the Power Button (or OK button if prompted) on the front panel.
-
-
Flashing Process: The display will show “Flashing” or a progress indicator. This usually takes about 2–4 minutes.
-
Completion: Once the display says “Success” or “Done”, the box will reboot.
-
Finalize: Unplug the USB stick as soon as the reboot begins to ensure it doesn’t try to flash again.
Quick Tips
-
If it won’t flash: Double-check that the internal folder is named
galaxy4k. Some older images might use a generic name that doesn’t trigger the bootloader. -
Automatic Mode: If the front button isn’t responding, go into the
galaxy4kfolder on your PC, find the filenoforce, and rename it toforce. This will make the receiver flash automatically upon power-on.

The flashing process should take approximately two to four minutes to complete, while the receiver
is being flashed it is vitally important that you DO NOT power the receiver down for any reason as
this can cause serious and or permanent damage.