[HOW TO FLASH] how to flash worldvision f1 plus

The Worldvision F1 Plus is a twin-tuner Enigma2 receiver known for its speed, but like many boxes from its generation, it is very specific about its file structure.
Preparation
-
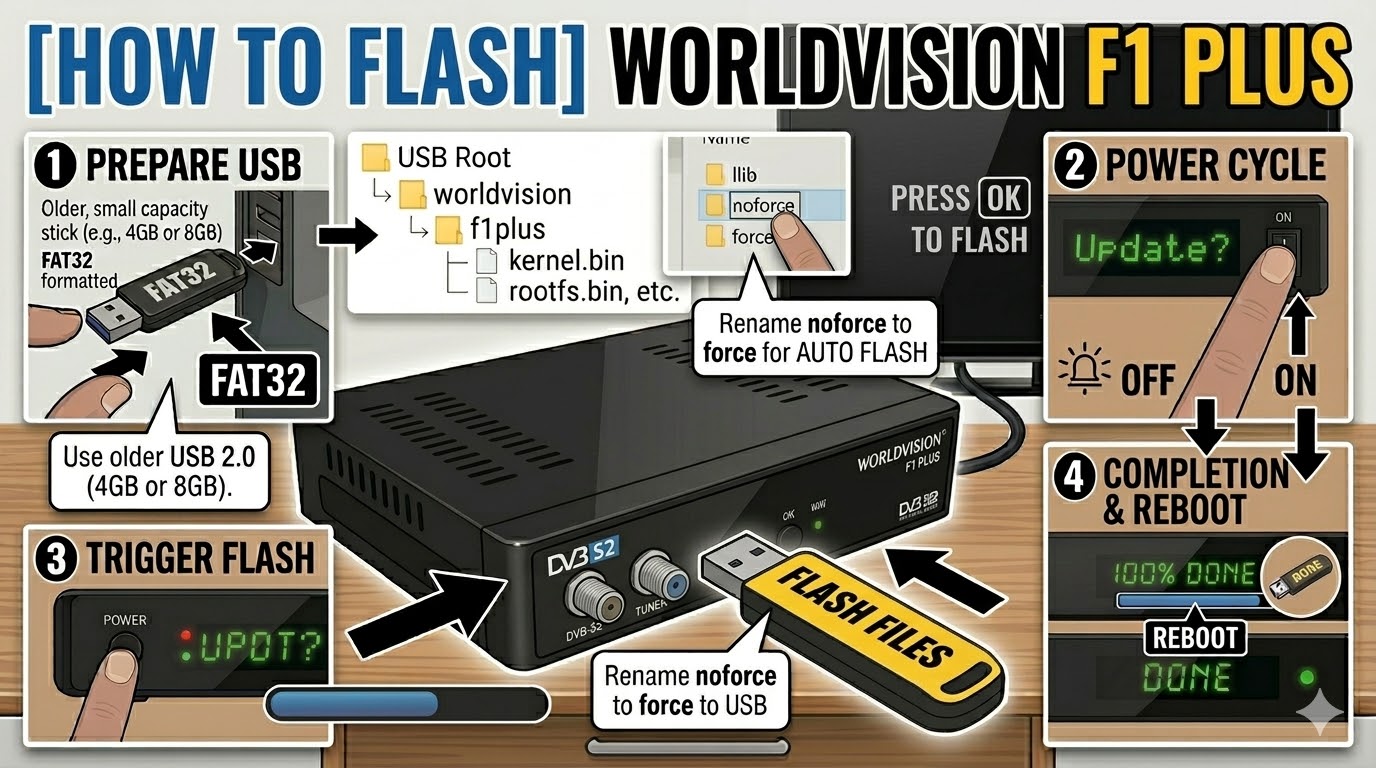
USB Drive: Use a FAT32 formatted USB stick. For Worldvision models, an older USB 2.0 (4GB or 8GB) drive is the most reliable choice.
-
The Files: Extract your image zip (e.g., OpenATV, OpenViX). You must see a folder named
worldvisionand a subfolder inside it namedf1plus. -
Root Path: Copy the
worldvisionfolder to the root of the USB drive.-
Structure:
USB Root > worldvision > f1plus > (files: kernel.bin, rootfs.bin, etc.)
-
Flashing Steps
-
Power Down: Turn off the receiver using the physical power switch at the rear.
-
Insert USB: Plug the USB stick into the front USB port (hidden behind the flap). This port is often prioritized for flashing on the F1 Plus.
-
Power On: Flip the rear switch to ON.
-
The Trigger: * Watch the front VFD display. When it detects the USB, it will show a message like “Confirm?” or “Update?”.
-
Immediately press the Power Button on the front panel (behind the flap) to start the flash.
-
-
Monitoring: The display will change to “Flashing” or show a progress percentage. This typically takes 3 to 5 minutes.
-
Completion: Once the process is finished, the display will say “Success” or “Done”, and the box will reboot automatically.
-
Finalize: Remove the USB stick as soon as the box starts to reboot to avoid an endless update loop.
Quick Troubleshooting
-
Box Boots Normally: If the receiver ignores the USB, ensure the folder name is exactly
f1plus. Also, try using the rear USB port if the front one isn’t responding. -
The “Force” Shortcut: If the front button is hard to trigger, find the file named
noforcein thef1plusfolder on your USB and rename it toforce. The receiver will then flash automatically upon power-up.