[HOW TO FLASH] how to flash vimastec 1000

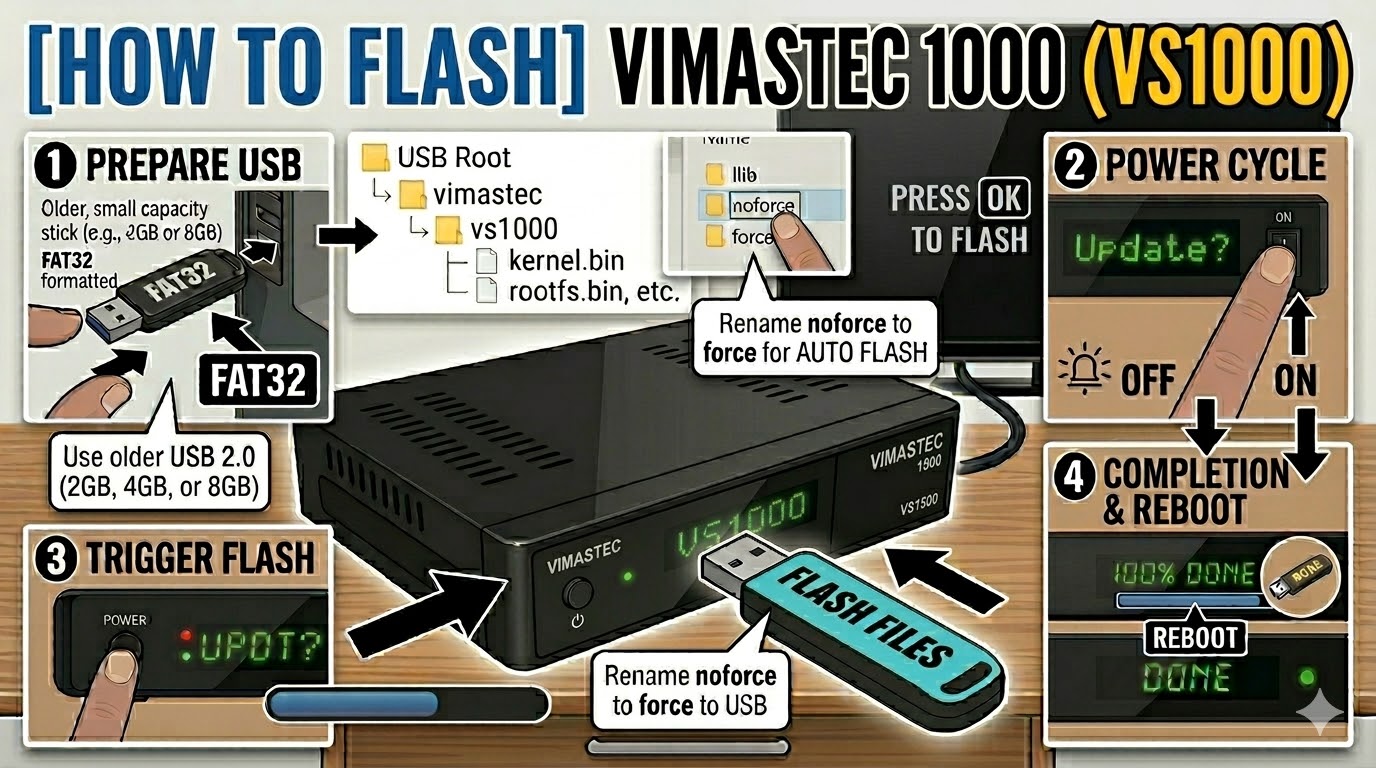
The Vimastec 1000 (VS1000) is the compact version of the VS1500, but it uses the same Broadcom-based flashing logic. Because it’s an older HD-ready receiver, the “picky USB” rule is even more important here.
Preparation
-
USB Drive: Use a FAT32 formatted USB stick. For the VS1000, try to find an old 2GB or 4GB USB 2.0 drive. Many users find that modern 16GB+ drives simply won’t be recognized by the bootloader.
-
The Files: Extract your image (e.g., OpenATV). You must have a folder named
vimastecand a subfolder namedvs1000. -
Root Directory: Copy the
vimastecfolder to the root of your USB stick.-
Structure:
USB Drive -> vimastec -> vs1000 -> (bin/image files)
-
Flashing Steps
-
Power Down: Turn off the receiver using the physical power switch at the back.
-
Insert USB: Plug the USB stick into the rear USB port.
-
Power On: Turn the back switch to ON.
-
The Trigger: * Watch the front panel LED.
-
When the LED starts to blink rapidly or changes color, immediately press the Power Button on the front of the receiver.
-
-
Flashing Process: The LED will continue to blink or change patterns while the image is written. This takes about 3–5 minutes.
-
Completion: The receiver will automatically reboot.
-
Finalize: Remove the USB stick as soon as you see the boot logo on the TV screen.
Troubleshooting
-
“No USB” Issue: If the box boots directly to your old image, ensure the folder name is exactly
vs1000. If it still fails, try renaming the folder toatemio5x00(some early VS1000 batches used Atemio-branded bootloaders). -
Automatic Flash: If your front button is unresponsive, find the file
noforceinside thevs1000folder and rename it toforce. The receiver will then flash automatically upon power-up.