[HOW TO FLASH] how to flash DINOBOT 4K plus
Flashing the Dinobot 4K Plus (Step-by-Step)
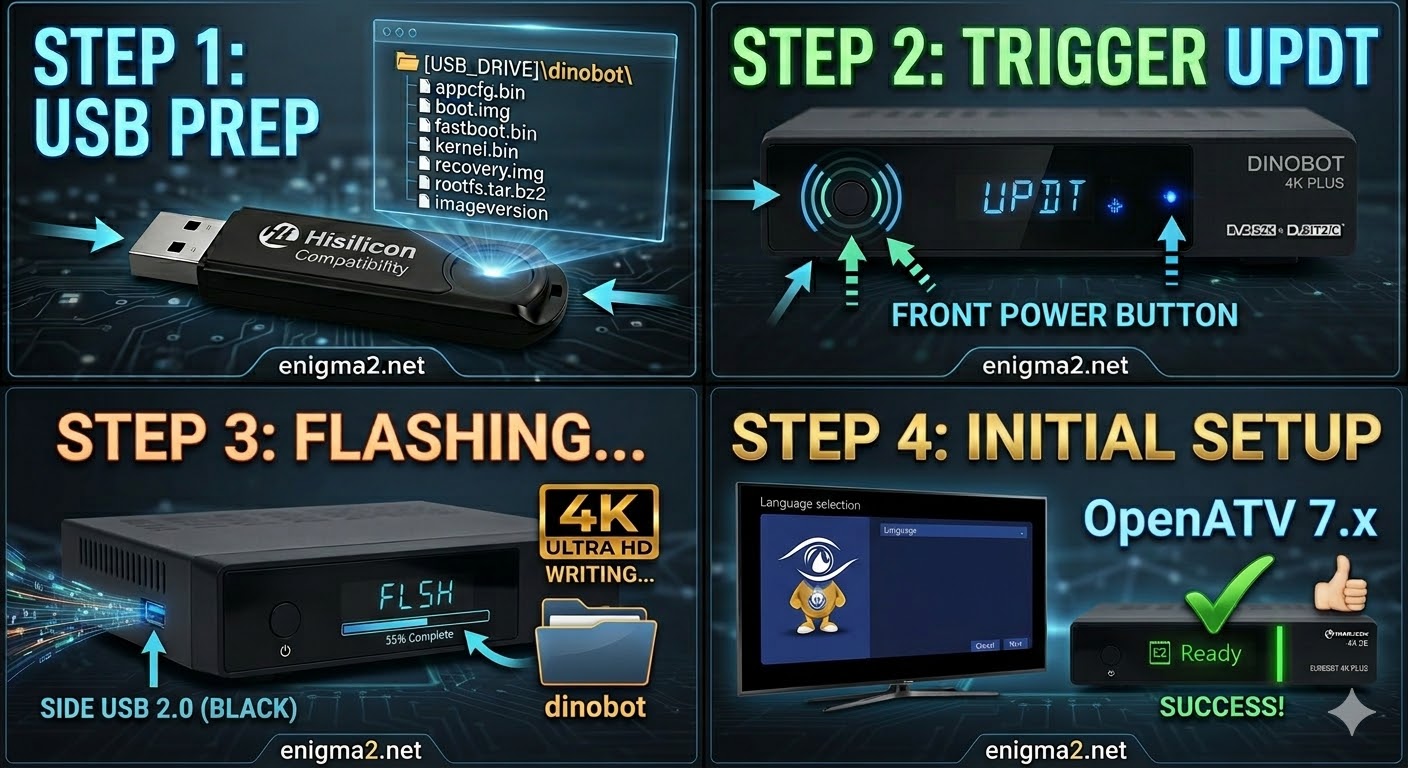
1. Prepare the USB Drive
-
Format: Use a high-quality USB 2.0 stick (FAT32). Hisilicon bootloaders are notoriously sensitive to USB 3.0/3.1 drives; a standard 4GB or 8GB USB 2.0 stick is the “gold standard” for this process.
-
The Folder Path: Extract your Enigma2 image (OpenATV, etc.). The root of your USB drive must contain this exact folder:
-
USB_ROOT/dinobot/
-
-
Verify Files: Inside the
dinobotfolder, ensure you have:-
appcfg.bin,boot.img,fastboot.bin,kernel.bin,recovery.img, androotfs.tar.bz2.
-
2. The Flashing Procedure
-
Power Down: Turn off the receiver using the physical power switch at the back.
-
Insert USB: Plug the stick into the USB 2.0 (Black) port. (Avoid the Blue USB 3.0 port during the initial flash if possible, as it can sometimes fail to mount in the bootloader).
-
The Trigger (The “Green Button” Method):
-
Turn the power switch to ON.
-
Immediately start tapping the Green Button on your Remote Control repeatedly.
-
Watch the Front Display: When the display shows “UPDT” (Update), stop tapping.
-
-
Wait: The process will take about 3–5 minutes. The front display will show the flashing progress. Do not interrupt the power.
-
Finish: The receiver will reboot automatically into the Enigma2 setup wizard.
Dual-Boot Switching (Remote Shortcuts)
Since this is a “Plus” model, users often switch between OS environments. During the boot-up splash screen:
-
Hold Red Button: Boots directly into Enigma2.
-
Hold Blue Button: Boots directly into Android TV.

The flashing process should take approximately two to four minutes to complete, while the receiver
is being flashed it is vitally important that you DO NOT power the receiver down for any reason as
this can cause serious and or permanent damage.