[HOW TO FLASH] how to flash maxdigital XP1000
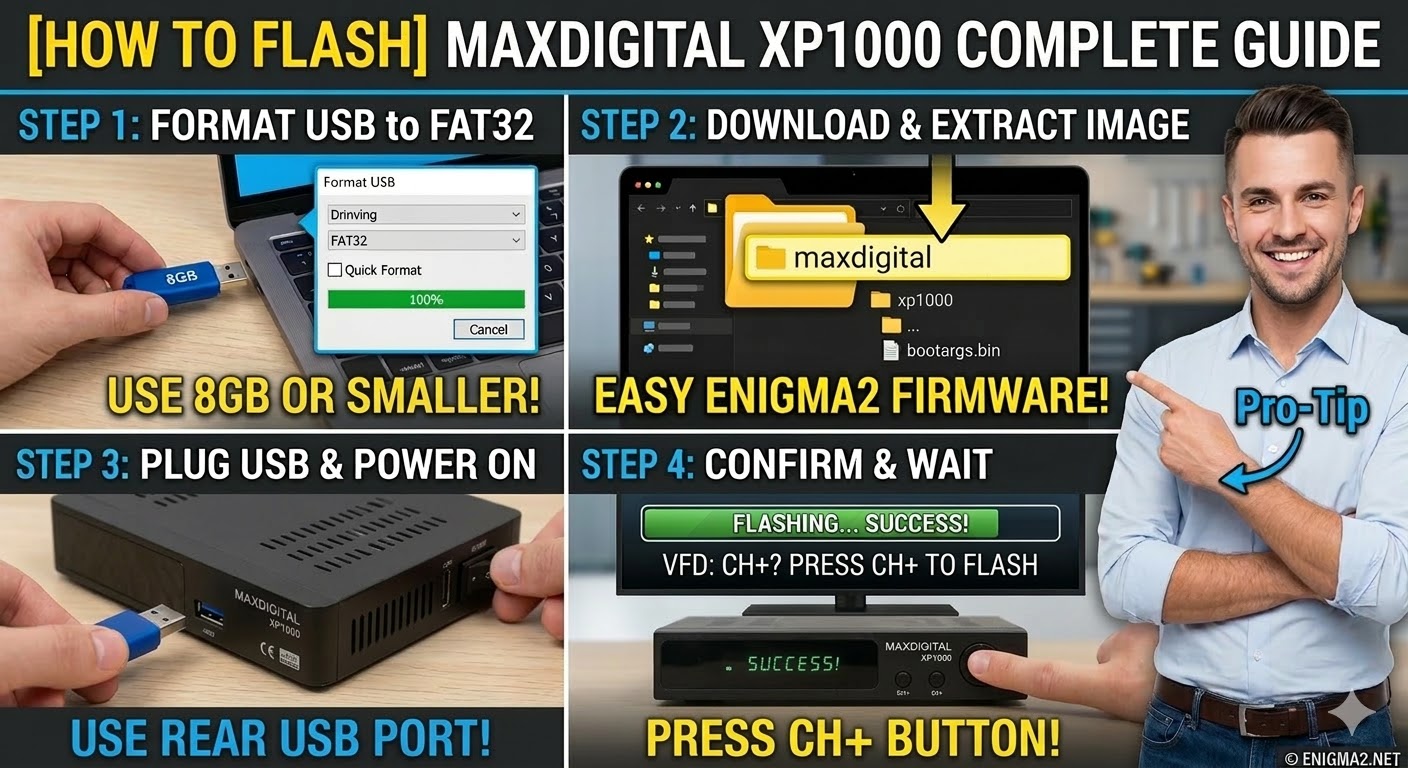
To flash the Maxdigital XP1000, you will use a procedure very similar to its sibling, the Octagon XP1000. This is a classic Broadcom-based receiver that remains a favorite for its stability with images like OpenATV and OpenPLi.
1. Preparation
-
USB Stick: A high-quality USB stick (8GB or smaller is best for these older bootloaders).
-
Format: The stick must be formatted to FAT32.
-
Firmware: Download the image specifically for the XP1000.
2. Folder Structure
The bootloader looks for a specific directory path on the USB root.
-
Extract the downloaded firmware
.zipfile on your computer. -
You will see a folder named
xp1000. -
Copy the entire
xp1000folder to the root of your USB stick.-
Path:
USB:\xp1000\ -
Contents: Inside the
xp1000folder, you should see files likekernel.bin,rootfs.bin, andimageversion.
-
3. The Flashing Process
-
Power Off: Turn off the receiver using the power switch at the back.
-
Insert USB: Plug the USB stick into one of the USB ports (the rear port is often more reliable for flashing).
-
Power On: Turn the back power switch to ON.
-
Initiate Flash:
-
Watch the front panel LED.
-
As soon as the LED starts to flash or changes color, quickly press the CH+ (Channel Up) button on the front panel to confirm the flash.
-
-
Wait: The LED will blink during the flashing process. Do not interrupt the power.
-
Completion: Once the process is finished, the receiver will reboot automatically. You can then remove the USB stick.
Pro-Tip for enigma2.net
The CH+ button is the specific trigger for the XP1000 series. If the user doesn’t press it quickly enough, the box will skip the update and boot into the old image. On your site, emphasize that the folder name must be exactly xp1000 in lowercase. If they are using an image from an Octagon box, the folder might be named xp1000p—this will not work on the Maxdigital unless renamed.